common:control_panel
Table of Contents
Open TapeTrack Control Panel
The TapeTrack Control Panel can be accessed from the File Menu→Open TapeTrack Control Panel from TapeMaster and Checkpoint, or by clicking the more button (..) to the right of the server drop-down box on the login screen on TapeMaster, Checkpoint and Lite.


The TapeTrack Control Panel is divided into two tabs: TapeTrack Servers and Advanced Connection Settings.
TapeTrack Servers
The TapeTrack Servers tab displays active server connections.

Right-Click Operations
There are four options available when right-clicking in the TapeTrack Servers tab.

- Add: Launches the Server Information window to add additional connections. There are four fields in the Server Information Window.
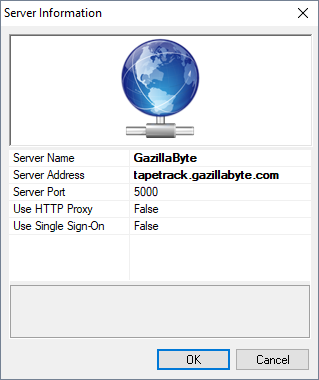
- Short Name: How this connection will be displayed in the TapeTrack login window.
- Address: The address of the TapeTrack Server.
- IP: The IP of the Server.
- Port: The port of the TapeTrack Server.
- Proxy: If set to “true”, the HTTP Proxy Settings will need to be set in the “Advanced Connection Settings” tab. See below.
- Delete: Deletes the Server from the list.
- Properties: Launches the Server Information window above so that changes can be made to a Server.
- Create Desktop Shortcut: Places a shortcut to this connection on the desktop of your Windows PC.

Advanced Connection Settings
The Advanced Connection Settings tab provides additional settings for when a Server uses an HTTP Proxy. It has the following fields:
- Address: The IP Address or Name of the HTTP Proxy Server.
- Port: The TCP/IP Port of the HTTP Proxy Server.
- User-ID: The User-ID for Proxy Authentication (if required).
- Password: The Password for Proxy Authentication (if required).
- Automatically detect HTTP Proxy: Click this button to automatically detect an existing HTTP Proxy Connection.
common/control_panel.txt · Last modified: 2025/01/21 22:07 by 127.0.0.1