This is an old revision of the document!
Table of Contents
Desktop Scan Window
Overview
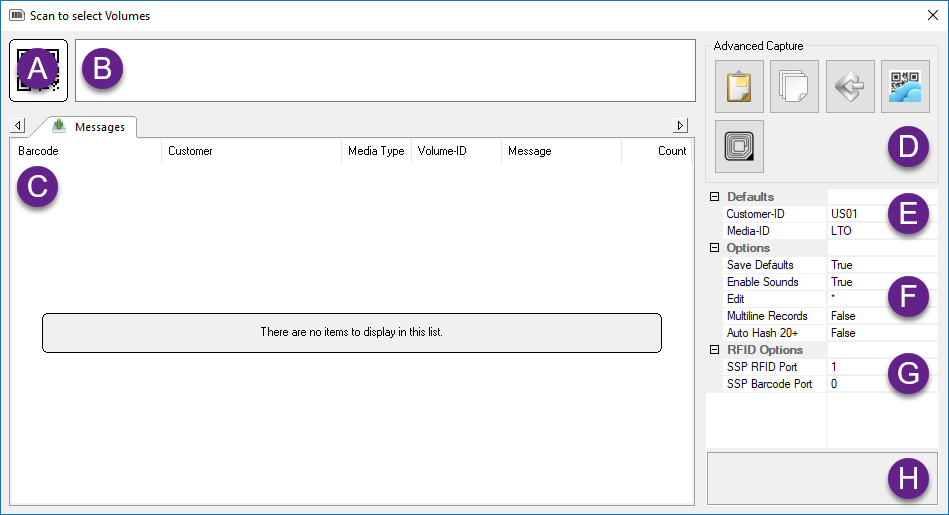
The Desktop Scan Window is the common interface used by TapeTrack Desktop Programs to scan information into TapeTrack.
The window supports various scan input options, including:
- Barcode scanner,
- GazillaByte CloudScan Mobile Devices
- Keyboard
- Windows Cipboard
- File Input via Cut and Paste and Multiple File Selection.
Notes:
- A Alphanumeric display of barcode.
- B Scanned, or entered, display of barcode.
- C List of scanned, or entered, barcodes.
- D Options to enter barcodes including windows clipboard, file, cloud scan and SCSI.
- E If Barcode Administration is not set to assume a Customer-ID or Media-ID for a given Volume, Defaults can be set to associate Unqualified Barcodes with a specific Customer and Media Type.
- F The Barcode Scanning Window uses sounds to verify scans. To disable this, set
Enable Soundsto False.
With the Scan Out Volumes input window open and in focus use a barcode scanner, or CloudScan app, to scan volumes from the Scan-Out list. Correct volumes scanned out will display in the lower window with an audible beep and a message “Request OK”. Incorrect volumes will display in the lower window with an audible warning “The volume scanned was not in the list” and message displayed in red Scanned Volume is not in the list. Incorrect volumes scanned will not be entered into TapeTrack. Click the X in the top right corner when finished scanning volumes.
Windows Clipboard
Copy the volume-ID/s to windows clipboard. With the Scan Out Volumes input window open (click the button with the scanner image at the top right of the window to open if required) click the paste button at the top of the window and volume ID/s will be scanned out. Click the X in the top right corner when finished scanning volumes.
File Input
With the Scan Out Volumes input window open click on the file input button {image} Open the file containing the volumes to be scanned out by clicking on the file input button at the top of the window. Locate and select the file in the browser and click open. Volumes will be loaded from the file and scanned out. Click the X in the top right corner when finished scanning volumes.
Keyboard Input
With the Scan Out Volumes input window open and in focus type in the volume/s barcode and hit enter to scan volumes from the Scan-Out list. Correct volumes scanned out will display in the lower window with an audible beep and a message “Request OK”. Incorrect volumes will display in the lower window with an audible warning “The volume scanned was not in the list” and message displayed in red Scanned Volume is not in the list. Incorrect volumes scanned will not be entered into TapeTrack. Click the X in the top right corner when finished scanning volumes.
Mouse Input
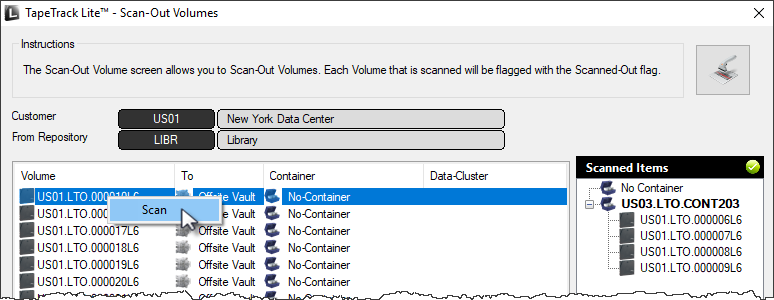
Close the Scan Out Volumes input window by clicking the X in the top corner. In the Scan Out Volumes window select volumes from list by left clicking volume-ID. Multiple volumes can be selected by using shift + click and/or control + click. Right click selected volume/s and select scan. Volumes can also be scanned out by pressing the spacebar after selecting the volumes. As this method simply checks off the volumes displayed. Care must be taken to ensure the volume ID's displayed, accurately match the volumes being selected to scan out.
Change Customer or Media Type
There are two ways to change the Customer and or Media Type when in the Scan Windows.
# Manually enter the new Customer ID and Media Type in the ''Defaults'' window.
# Scan a Barcode for the new Customer and Media Type.


